
Fonte: N.Design Studio
Let's have some fun for Halloween. Vamos nos divertir no Halloween. Learn how to draw a realistic Halloween pumpkin in Illustrator. Aprenda a desenhar uma abóbora de Halloween realista no Illustrator. Perhaps you can attach to your eCard or email. Talvez você pode anexar a seu eCard ou e-mail. This tutorial will focus on the Pen Tool, Pathfinder, and Gradient Tool. Este tutorial irá focar a Pen Tool, Pathfinder e Gradient Tool.
Required: Illustrator 9+ + 9 Requerido: Illustrator
1. Basic shapes 1. Formas básicas
First, use the Pen tool and draw the basic shapes of the pumpkin. Primeiro, use a ferramenta Pen e desenhar as formas básicas da abóbora.

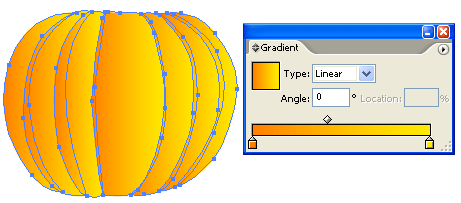
2. Fill Gradient 2. Preenchimento gradual
Fill the shapes with a linear gradient with no stroke fill. Encher as formas com um gradiente linear sem preenchimento curso. Gradient color1: R =255 G =127 B =0, color2: R =255 G =127 B =0 Gradiente color1: R = 255 G = 127 B = 0, color2: R = 255 G = 127 B = 0
3. Shading 3. Sombreamento
Select all shapes, go to menu Edit > Copy (Ctrl+C). Selecione todas as formas, ir ao menu Editar> Copiar (Ctrl + C). Then go to menu Edit > Paste in Front (Ctrl+F) to paste in position. Em seguida, vá ao menu Editar> Colar no Front (Ctrl + F) para colar em sua posição.

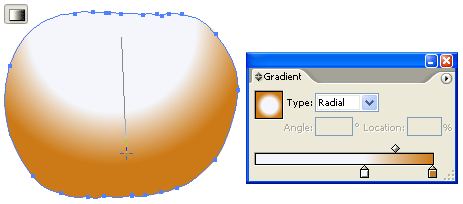
With the shapes remain selected, open Pathfinder palette (Window > Pathfinder). Com as formas permanecem selecionados, a paleta Pathfinder aberto (Janela> Pathfinder). Hold down Alt key, click on Add to shape area . Segure a tecla Alt, clique em Add to shape area. This will merge shapes together. Isso irá mesclar formas juntos.

Select the following gradient setting – color1: R =255 G =255 B =255, color2: R =204 G =122 B =22. Selecione o gradiente seguinte configuração - color1: R = 255 G = 255 B = 255, color2: R = 204 G = 122 B = 22. Slide the white picker toward the right side. Deslize o seletor de branco para o lado direito. With the merged shape remain selected, drag from the upper center toward bottom. Com a forma mesclada permanecer selecionada, arraste a partir do centro da parte superior para inferior.
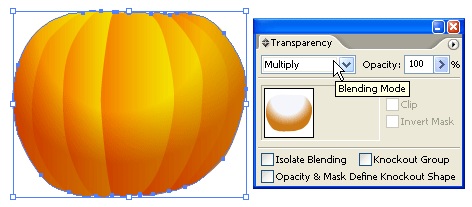
Change the Blending Mode of the merged shape to Multiply . Alterar o modo de blend da forma fundida para o Multiply.
4. Stem 4. Tronco
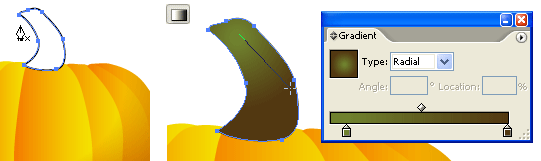
Use the Pen tool and draw a shape of stem on top of the pumpkin. Use a ferramenta caneta e desenhe uma forma de haste em cima da abóbora. Fill it with a radial gradient as shown. Encha-o com um gradiente radial, como mostrado. Gradient color1: R =111 G =129 B =46, color2: R =82 G =56 B =17. Gradiente color1: R = 111 G = 129 B = 46, color2: R = 82 G = 56 B = 17.
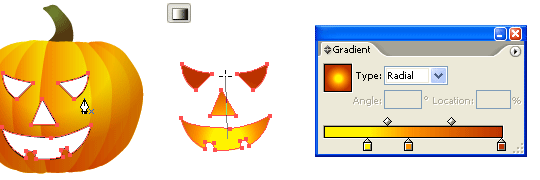
5. Cutout Face 5. Face recorte
Make a new layer on top of the pumpkin. Faça uma nova camada em cima da abóbora. Use the Pen tool and draw the basic shapes of the face. Use a ferramenta Pen e desenhar as formas básicas do rosto. Select all the shapes (face only), use the Gradient tool and fill it with a radial gradient as shown. Selecione todas as formas (face única), use a ferramenta Gradiente e preenchê-lo com um gradiente radial, como mostrado. Gradient color1: R =255 G =242 B =0, color2: R =255 G =146 B =0, color3: R =187 G =50 B =0. Gradiente color1: R = 255 G = 242 B = 0, color2: R = 255 G = 146 B = 0, color3: R = 187 G = 50 B = 0.
6. Depth 6. Profundidade
Now, we need to add some depth to the pumpkin cutouts. Agora, precisamos adicionar alguma profundidade para os recortes de abóbora. Use the Pen tool, roughly draw a shape intersect with the left eye cutout. Use a ferramenta Pen, cerca de desenhar uma forma se cruzam com o corte do olho esquerdo. Then Copy the left eye and Paste in Front . Então Copie o olho esquerdo e colar na frente. Select the left eye shape and the intersect shape, go to Pathfinder, hold down Alt key and click on Intersect shape areas . Selecione a forma do olho esquerdo ea forma interseção, vá para o Pathfinder, mantenha pressionada a tecla Alt e clique na forma áreas Intersect.
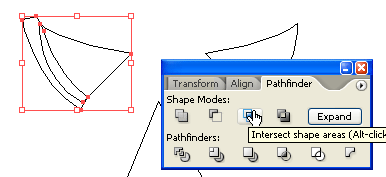
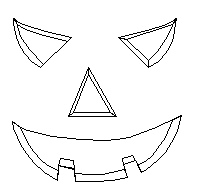
Repeat this step until you get all the features done (eyes, nose, and mouth). Repita este passo até obter todos os recursos feito (olhos, nariz e boca).
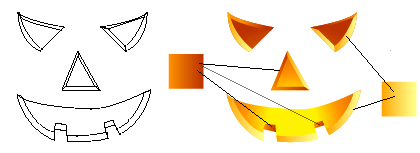
7. Shadow & Highligh 7. Shadow & Highligh
Fill the shadow area with a darker gradient (color1: R =255 G =146 B =0, color2: R =187 G =50 B =0). Preencha a área de sombra com um tom mais escuro gradiente (color1: R = 255 G = 146 B = 0, color2: R = 187 G = 50 B = 0). Then fill the highlight area with a lighter gradient (color1: R =255 G =255 B =139, color2: R =255 G =164 B =0). Em seguida, preencher a área de destaque com uma leve inclinação (color1: R = 255 G = 255 B = 139, color2: R = 255 G = 164 B = 0).
Final Final
That's it! É isso aí!

Nenhum comentário:
Postar um comentário